- RNG Mechanics
- Home
- RNG Mechanics
- Battling
- Guides
- Battle Challenges
|
PPRNG Guide - Receiving Perfect Dream Radar Pokemon
- Introduction
- The Basics of RNG Abuse
- How to RNG Abuse your TID/SID combo
- Capturing/Receiving Perfect (and Shiny) Pokemon
- Breeding Perfect (and Shiny) Pokemon
- Receiving Perfect Wondercard Pokemon
- Capturing Roaming Pokemon
- Controlling Encounters in Hidden Grottoes
-
Receiving Perfect Dream Radar Pokemon
- Prerequisites
- Receiving Dream Radar Pokemon
- Capturing Perfect Entralink Pokemon
The 3DS downloadable application 'Pokemon Dream Radar' gives access to a number of Pokemon with Hidden Abilities. This includes several non-legendary Pokemon not otherwise available with their Hidden Abilities, as well as the Generation 5 genies (Tornadus, Thundurus, and Landorus) in their Therian formes and the Generation 4 mascots (Dialga, Palkia, Giratina, Ho-Oh, and Lugia).
Prerequisites
You should be familiar with the process of calibrating using the Unova Link IR Key Transmission menu. See the Unova Link Calibration section for details.
Important Note 1
The first and most important thing to be aware of when RNGing Dream Radar Pokemon is that the legendaries can only be received once per game save and there is no resetting after a failure. The act of receiving a Pokemon writes it directly to your game save, so if an error is made in the RNG process (or if you already received a specific legendary on your game without RNGing it), you won't have a second chance without deleting your game save and starting a new game. Therefore, it is strongly recommended that you first practice RNGing non-legendary Pokemon from the Dream Radar, as they can be received any number of times.
Important Note 2
Another key point to be aware of is that the all of the contents of the Dream Radar application are stored on the SD card of the 3DS. This means that you can—and definitely should—take back-ups of the Dream Radar game state before sending Pokemon to your Black 2 or White 2 game by copying the SD card contents (the entire folder named 'Nintendo 3DS') to another device such as your computer. You can later restore a back-up to the SD card and send the same Pokemon to another Black 2 or White 2 game (or in the case of non-legendaries, to the same game you previously sent them to). Doing this is key for being able to send the legendaries to more than one game, as you are only allowed to send them once per Dream Radar game save.
Note that copying the whole 'Nintendo 3DS' folder copies all downloaded games and their save states, not just the Dream Radar. You should therefore be careful when restoring any SD card back-ups because you will also be overwriting the game states of your other games. The easiest way to deal with this is to have a second SD card that you use only for RNGing on the Dream Radar and leave your main SD card as-is so that you don't accidentally lose any progress in other games. You can of course get by with a single SD card, but you will need to take care to always backup your 'current' card state before overwriting it with a backed-up state.
Important Note 3
All Pokemon currently captured in the Dream Radar application are sent to your Black 2 or White 2 game at the same time. Given the relative rarity of good Dream Radar seeds, it is only realistic to RNG one out of a group of simultaneously received Pokemon, so you will need to choose which will be the target of RNG abuse. Additionally, the exact behavior of the RNG when receiving both legendaries and non-legendaries at the same time has not been researched. Therefore, it is strongly recommended that when RNGing legendaries you have only your target legendary captured. Thankfully, legendaries have separate encounters using the specialized Dream Radar parts and are therefore easy to capture alone. (Note that items do not factor into the RNG process, so you can receive any number of items when RNGing Dream Radar Pokemon without concern.)
Receiving Dream Radar Pokemon
-
Capture your target Pokemon in the Pokemon Dream Radar game and send it to the game cart you will be RNG abusing on.
Start by clearing out any previously captured Pokemon by sending them to any game cart. If there is something you have captured that you might wish to RNG at a later time, take a back-up of your 3DS's SD Card before sending the Pokemon. Once there is nothing remaining to be sent, capture your target Pokemon in the Dream Radar. Note that since most non-legendaries are random, it may take numerous attempts to encounter and capture your desired Pokemon. This is not a guide to the Dream Radar application. You can read about that here.
Before sending captured Pokemon to your game cartridge, you will have to receive any Pokemon that were previously sent from the Dream Radar. You can of course RNG abuse those as well; however, this guide is written as if you are starting from the beginning of the process.
-
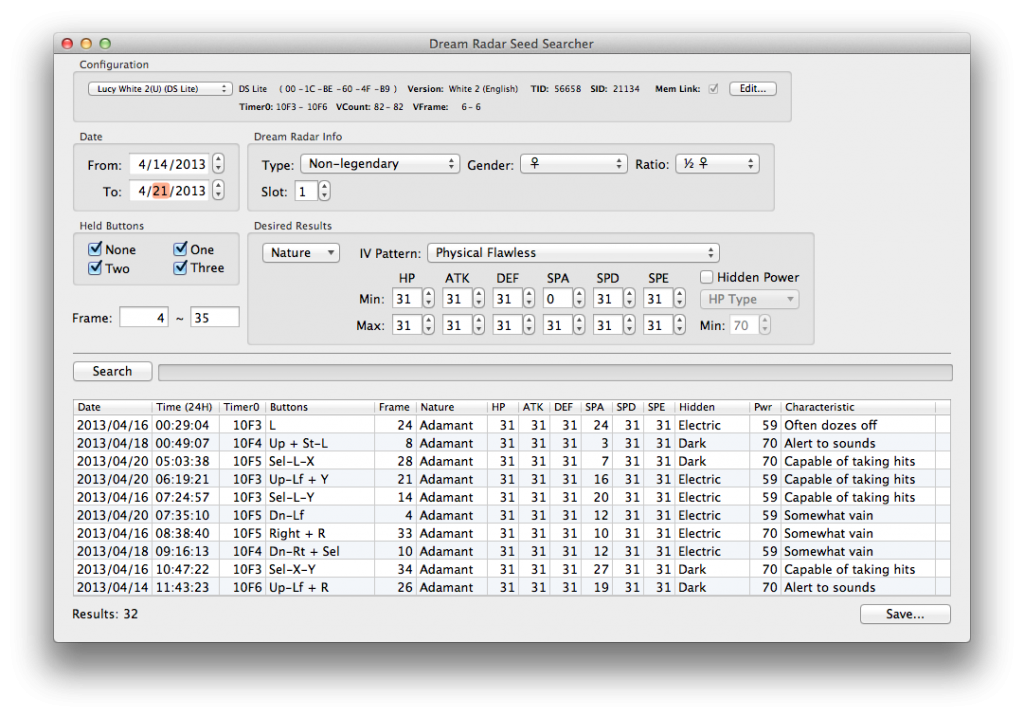
Open the Dream Radar Seed Searcher, and configure it appropriately.

- Date and Held Buttons
- As with other Generation 5 searches, configure the date range and number of buttons. More dates and more buttons means more possible seeds but a longer search time.
- Low Frame
-
You should never search lower than frame 4, as that would give you fewer than 3 spinner spins (see below) to verify that you've hit your seed. This would mean that you cannot be completely certain that you've hit your seed. (3 spins is not always sufficient either, but less than 3 is basically not usable, especially if you are trying for a one-time legendary and want to be certain that you hit your seed.)
- High Frame
-
PPRNG has a seed cache that supports faster searching up to somewhere between DR frames 35 and 40, depending on various other conditions. You can search for higher frames if you are having difficultly finding a good result or you are looking for seeds on some particular dates, however the search will be much slower.
- Dream Radar Info
-
This is where you configure the information about the Pokemon you are receiving, and it is extremely important that you get this correct.
- Type
-
This refers to the three different types of Pokemon you can receive from the Dream Radar: non-legendary, the genies (in Therian forme), and the Generation 4 legendary mascots. Choose the appropriate one.
- Slot
-
This is the position (as shown in the Dream Radar application) of the Pokemon when receiving more than one at the same time. It starts with slot 1 on the left and goes up to slot 6. This is also true for the legendaries; however, you should never receive more than one legendary at the same time (unless you find yourself with no other choice for whatever reason), nor should you receive a mix of legendaries and non-legendaries at the same time, as the exact behavior in that situation is not researched. Note: Therians will always be received before regular Pokemon.
- Gender
-
Legendaries have either no gender or a fixed gender; however, for non-legendaries you should choose the gender and ratio corresponding to the Pokemon you are receiving. If you are receiving a gendered Pokemon for the first time, you won't actually know what gender it is; however, Dream Radar Pokemon seem to be female more often than male so you should be fine choosing that. The only thing that is critical to get correct here is whether the Pokemon is gendered or genderless, as genderless Pokemon are generated in a slightly different way from gendered ones and getting this setting wrong will result in an incorrect nature. (Note that if you set the wrong gender for a gendered Pokemon, the characteristic that PPRNG displays for that Pokemon will be incorrect.)
- Number of Genderless Pokemon in Preceding Slots
-
If you are targeting a non-legendary Pokemon on slot 2 or higher, you need to specify how many of the Pokemon in the lower slots are genderless. If you don't specify this correctly, it will result in an incorrect nature. For legendary Pokemon (which you should never have in a slot higher than 1) this setting is unnecessary.
- Desired Results
- Set your desired IV ranges, Hidden Power type, and nature.
-
Start the search.
And wait for results to start showing up.
-
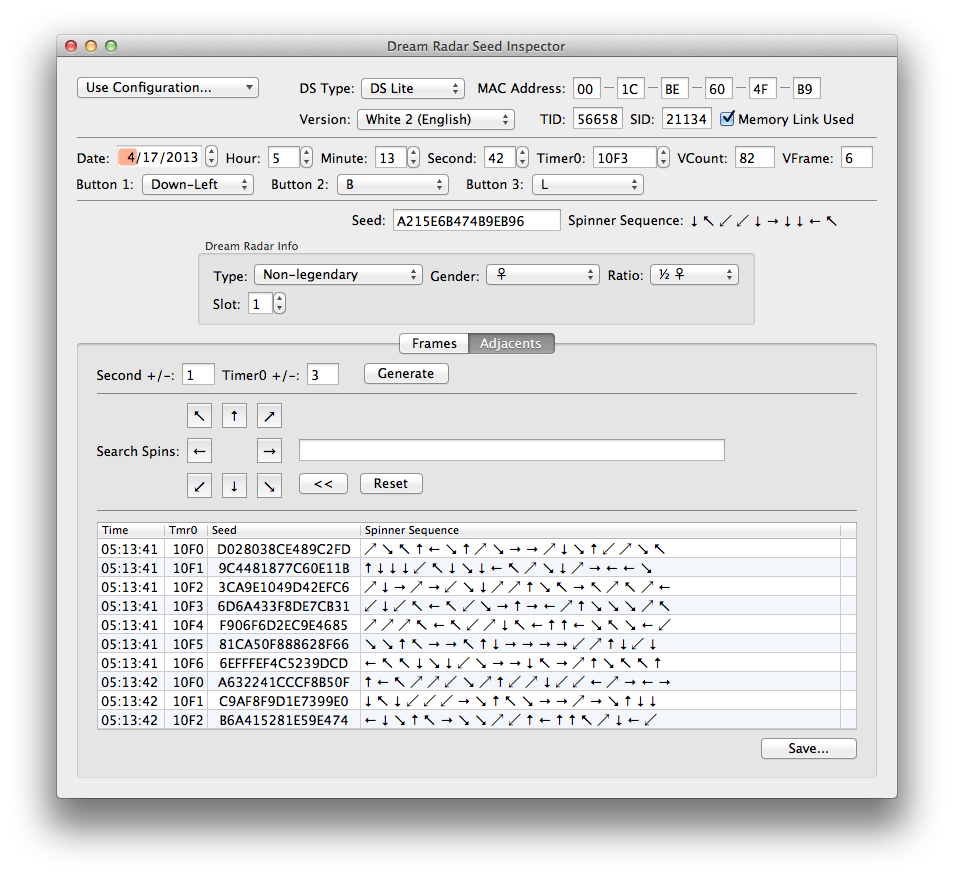
Find a result that you like, and double-click on it to open it in the Dream Radar Seed Inspector.
Note that your seed details are set at the top of the window and your target frame is already selected.
Besides the normal Pokemon stats, there is a column labeled 'Spinner' with an arrow indicating a certain direction. If you are familiar with calibrating your game using the Unova Link Key System IR Transmission functionality, then you may already understand its meaning. If you are not yet familiar with how to use the Unova Link Key System IR Transmission functionality to determine your game parameters, please refer to the Unova Link Calibration section before proceeding further.
-
Switch to the Adjacents tab and prepare to hit your seed.
The method for advancing Dream Radar frames is to view the IR Key Transmission screen one time for each frame you are skipping. Each time you view the screen, you will note the initial position of the spinner and use that to determine whether you hit your seed as well as which frame you are currently on. If you are familiar with Generation 4 RNG abuse, this process is very similar to using Professor Elm calls.
Switch to the Adjacents tab and click the generate button.
The Adjacents tab shows the spinner patterns for adjacent seeds, and allows you to enter each initial spinner position to determine which seed you have hit. It usually only takes 3 spins to be fairly certain which seed you have hit.
-
Reset and attempt to hit your seed.
Just as if you were attempting to hit a standard seed, set the date and time on your DS and restart with the appropriate held buttons in order to hit your seed.
Once you reach the main menu of the game, enter the Unova Link menu and proceed to the Key System. Begin the process of activating the IR Key Transmission function to determine the initial spinner position, entering that position into the Adjacents tab searcher, canceling out of the IR Transmission, and then repeating the process until you have determined which seed you have hit. If you missed your seed, reset and try again.
A miss...
-
Advance to the correct frame.
Once you have hit your seed, take note of the number of spins you have done. In our case, it was 4.
Switch back to the Frames tab. The number of spins you have viewed so far is equal to the number of frame advances, so you will need to continue doing IR Transmission spins to advance to your target frame. In our example, we advanced 4 frames when verifying the seed so we are currently on frame 5 (meaning that if we received the Pokemon now, it would match frame 5 in the Frames tab).
Our target frame is 10, so we need to advance 5 more times, which is done by viewing the Key System IR Transmission spinner 5 times. The Spinner column in the Frames tab shows what the spinner position should be for each frame to help you keep track of your current position. In the above example, the next spinner position would be pointing down, and after viewing that you would be on frame 6. Looking at our target frame of 10 (see screenshot at step 4), the final spinner position we would see before receiving our Pokemon would be left, the position shown in the Spinner column of frame 9.
-
Receive your Pokemon.
After you have advanced to the correct frame (i.e. you have viewed all spinner positions shown up to the frame before your target frame), exit back to the top level Unova Link menu. Do not exit the Unova Link completely as this will reseed your game and ruin your RNG attempt.
Access the Nintendo 3DS Link menu and receive your Pokemon. If everything was done correctly, you should now have your successfully RNG abused Dream Radar Pokemon waiting for you in your in-game box. Enjoy!
|