Understanding Numbers in LC and Beyond
| « Previous Article | Home | Next Article » |
Introduction
If you've ever played LC, some things that have kept you wondering might be: Why is the damage so weird? Why are some Pokémon losing 5% of their HP when using Life Orb and recovering 3-4% when using Leftovers? Why did a Substitute cost 21%, and why did a burn do 8%?
And then there are the rolls: Why would Honedge's Shadow Sneak 2HKO Misdreavus but not OHKO it at +2 Attack? Why do many calculations say there is a 6.3% chance to OHKO? Why does adding a defense point not reduce the damage taken from a certain attack then suddenly reduce the damage from another? And why is Life Orb Jolly Aipom with Fury Swipes doing 5 damage to Spritzee, while Life Orb Adamant Aipom does 20 damage to the very same Spritzee? This makes no sense, as Adamant only provides Aipom with one more Attack point.
This actually makes sense, but there is some reasoning to be made first. The goal of this article is to explain the odds and intricacies of the direct and indirect damage calculations, and, in short, how to optimize your Pokémon sets and master the rolls.
This article applies mainly to LC, as it is the metagame where screwing with calculations can give you one point of anything, and this point can be calculated to create more serious differences. However, one point can still have an impact in formats where the Pokémon are level 100. For example, some Pokémon will want to have an even or odd HP number; the difference can allow your Pokémon to switch in on Stealth Rock twice or cause your Pokémon to lose enough HP from Belly Drum in order to activate Sitrus Berry. Losing one fewer point of HP can be nice when using Life Orb, and gaining one more HP with Leftovers can be useful. However, these situations matter more in LC, because reducing Life Orb recoil damage from 27 to 26 in OU isn't quite the same as reducing Life Orb recoil damage from 2 to 1 in LC.
Optimizing one's stats
Let's get started! This part is mainly about optimization of the HP stat. The main thing to understand is that all calculations work with integers. When any number, be it stats or damage, isn't an integer, the game will round it down or up (mainly down) to make it one.
Stat boosts and Eviolite
Any stat augmentation will round down after application. Because of this, a 2*k number will become 3*k, but a 2*k + 1 will become 3*k + 1.
In short,
12 in a defensive stat becomes 18 with Eviolite.
13 in a defensive stat becomes 19 with Eviolite.
14 in a defensive stat becomes 21 with Eviolite.
This is why you should have even numbers in defenses when using Eviolite. You lose 0.5 points when you have an odd number. You can also see it this way: going from even to odd gives you one point, and going from odd to even gives you two points; however, the EV cost is the same. This also applies to stat boosts.
If you're running a Bulk Up or Calm Mind set,
16 in an offensive stat becomes 24 with +1.
17 in an offensive stat becomes 25 with +1.
18 in an offensive stat becomes 27 with +1.
Thus, you're better off having an even number in your attack stats, or you'll lose 0.5 points when at +1. The same applies to the combination of stat boosts and Eviolite.
Basic stat → After Eviolite → At +1
12 → 18 → 27. 12*2.25 = 27; you didn't lose anything.
13 → 19 → 28. 13*2.25 = 29.25; you lost 1.25 points.
14 → 21 → 31. 14*2.25 = 31.5; you lost 0.5 points.
15 → 22 → 33. 15*2.25 = 33.75; you lost 0.75 points.
16 → 24 → 36 16*2.25 = 36; you didn't lose anything.
Note that even though 14 is an Eviolite (even) number, you still lose a bit of effectiveness. This is because if you're willing to optimize your stat gain as much as possible, the number after applying Eviolite must still be convenient when applying a 50% boost, which means that it must be even. Your defensive stat should be a multiple of four, as that way, it's still even after being multiplied by 1.5, and you won't lose anything after applying the boosts.
The HP Stat
There is one golden rule for the HP stat: the damage will round down, but never to 0.
Life Orb will do 1 damage if your Pokémon has between 1 and 19 HP, it will do 2 damage if your Pokémon has between 20 and 29 HP, and so on (n for [n*10, n*10+9] HP). Because of this, after attacking twice, a Life Orb user with 21 HP is just as effective as one with 19 HP, because in both cases the Pokémon will be at 17 HP before applying damage taken from attacks. And because you normally plan for your Life Orb Pokémon to attack more than twice, it's better to have 19 HP.
This also applies to Pokémon at level 100. If you have a Life Orb Pokémon that has 280 HP, you should reduce its HP to 279 in order for Life Orb recoil to be 27 HP instead of 28.
Leftovers and Black Sludge will heal your Pokémon by its HP value divided by 16, rounded down. Because of this, a Pokémon that has 31 HP will be healed by 1.94 HP, which is rounded down to 1. This is why Leftovers is subpar in LC and why Eviolite is far better.
This also applies outside of LC. If a Pokémon has 319 HP and Leftovers, giving it one more point of HP will heal it by 20 instead of 19. This is because 320/16 = 20 and 319/16 = 19.9375. Your Pokémon's HP should be the highest multiple of 16 it can possibly be when you use Leftovers.
Entry hazards, Regenerator, statuses, and Substitutes will also cause damage to round down. If your Pokémon is neutral to Stealth Rock or if there is one layer of Spikes up, the entry hazards eat 12.5% of your Pokémon's HP, which is 2 HP for a Pokémon that has 23 HP because 23/8 = 2.875, but a Pokémon that has 24 HP will lose 3 HP, because 24/8 = 3. Burn, poison, and Leech Seed all follow the same calculations. That's why having 24 HP is dangerous in LC—it means that your Pokémon takes 50% or more damage from Stealth Rock, Spikes, Leech Seed, burn, and poison. You should avoid the 24 HP stat unless you have a good reason to reach it, which would only be when it has the Regenerator ability. Regenerator will heal your Pokémon by its total HP divided by three. So Regenerator will heal your Pokémon by 6 points if it has 20 HP, 7 points if it has 21 HP, 7 points if it has 23 HP, and 8 points if it has 24 HP. Because of this, 24 HP on Foongus and 21 HP on Life Orb Mienfoo is nice; the latter is an exception to the rule because it's a Life Orb user. The recoil will be 2 HP instead of 1, but Regenerator will heal Mienfoo by 7 HP instead of 6.
We concluded that reaching a number that is a multiple of eight is risky because of the 12.5% damage application. But there is also the 25% damage application in the case of 2x effective Stealth Rock or three layers of Spikes. In this case, what matter are numbers that are multiples of four. Vullaby will, for example, lose 1 HP more when it switches in on Stealth Rock if it has 24 HP instead of 23. That means that if you intend to use it as a Defogger, spending EVs to reach 24 HP is unwise, because in both cases you'll have 20 HP remaining. 25% HP is also the cost for using Substitute. If you have 20 HP, you will use 5 HP to have a 5 HP Substitute, and if you have 19 HP, you will use 4 HP for a 4 HP Substitute. Choosing your Substitute HP depends on what you intend to do with the Substitute user. For example, I barely care about the Substitute's HP on Substitute Life Orb Pawniard, so I run 19 HP. Some of my friends want to tank with it, so they use 21 HP.
This applies to other metagames as well. If your Pokémon has Substitute four times, you should avoid having HP values that are multiples of four, because they will only allow you three Substitutes.
Finally, there are times when your Pokémon loses half of its HP: when Stealth Rock is 4x effective and when your Pokémon uses Belly Drum. Belly Drum users should have even HP numbers, because this allows them to consume their item immediately after using the move. On the other hand, Pokémon that are 4x weak to Stealth Rock should have odd HP numbers, as this allows them to switch in on Stealth Rock more than once. For example, Magby's and Zigzagoon's IVs should be lowered so that they have 20 HP, not 21 HP, as otherwise Berry Juice would not activate after they use Belly Drum.
With regards to self-healing moves and Wish, the former rounds up, but Wish rounds down. That means that Wish users do not gain anything by having an odd HP number, and Pokémon with self-healing moves benefit from having an even HP number. Once again, you only need to reach 23 HP to heal 12 HP or 21 HP to heal 11 HP.
Understanding damage and building accordingly
BaseDamage = ((((2 × Level) ÷ 5 + 2) * BasePower * [Sp]Atk) ÷ [Sp]Def) ÷ 50 + 2
BP*Atk/Def/50 +2 = BP/12.5 * Atk/Def + 2 at level 5
Apply the multi-target modifier
Apply the weather modifier
In case of a critical hit, multiply the value by 1.5
Alter with a random factor
Apply STAB modifier
Alter with type effectiveness
Alter with user's burn
Make sure damage is at least 1
Apply the final modifier
This is the summarized damage calculation. The main thing to understand is that your DS pretty much doesn't know what a floating number is. No matter what, when the calculation protocol finishes a step, it rounds calculations down or up to turn things back into integers. In LC when there is no weather, your Pokémon isn't burned, and a critical hit doesn't occur, a simplified formula would be:
Base damage = (Base Power / 12.5 * Atk / Def) + 2
Round down.
Apply the random factor.
Round down.
Apply the STAB.
Round down.
Apply the effectiveness.
Round down.
(Apply Life Orb if there is one then round up.)
Applying a random factor means that you create your 16 rolls as an array of 16 values by multiplying the base damage by 0.85, 0.86, ... 0.99, 1.
Let's say that your base damage (after rounding down, that is) is 10. After applying the random factor, you will get the following damage array: [8.5, 8.6, ... 9.9, 10]. And, after rounding the damage down, you will get: [8,8,8,8,8,9,9,9,9,9,9,9,9,9,9,10] (8 five times, 9 ten times, 10 one time). The fact that your base damage is an integer means that you will lose at least 1 point by multiplying it by 0.99 and rounding it down. Because of this, you always have a 1/16 chance on the last roll to deal a higher amount of damage. Also, the damage possibility right before the last roll (9 in this case) is the most probable one. In cases where the base damage is 6 or less, the rolls will be 15 times the base damage minus 1. This is extremely important for multi-hit moves, which I will be coming back to later.
2x effective moves do a 2*k number as damage, and 4x effective moves do a 4*k number as damage (as long as the Life Orb doesn't interfere).
Effectiveness applies at the end of the damage calculation. The damage is calculated as if the move were normally effective, and the damage is multiplied by the effectiveness modifier. Because of this, 4x effective moves will always do a 4*k number as damage.
Example: 0 SpA Foongus Hidden Power Fighting vs. 0 HP / 116 SpD Eviolite Pawniard: 16-20 (76.1 - 95.2%) -- guaranteed 2HKO
(16, 16, 16, 16, 16, 16, 16, 16, 16, 16, 16, 16, 16, 16, 16, 20)
You can see that the damage jumps from 16 to 20; this is because the damage used to be 4 and 5 for 15 times until they were multiplied by four. Because of this, 16, 20, and 24 damage often applies to Pokémon that are 4x weak, and thus, 21 and 25 HP are good numbers to have. The fact that Eviolite Pawniard has 21 or more HP guarantees it doesn't get KOed by Hidden Power Fighting.
Here are some different Honedge sets as examples (taking Base Power / 12.5 * Atk / Def into account).
196+ Atk Honedge Shadow Sneak vs. 0 HP / 36 Def Eviolite Misdreavus: 12-14 (54.5 - 63.6%) -- guaranteed 2HKO
(12, 12, 12, 12, 12, 12, 12, 12, 12, 12, 12, 12, 12, 12, 12, 14)
Clean 2HKO. However:
+2 196+ Atk Honedge Shadow Sneak vs. 0 HP / 36 Def Eviolite Misdreavus: 18-24 (81.8 - 109%) -- 6.3% chance to OHKO
(18, 18, 18, 20, 20, 20, 20, 20, 20, 20, 20, 20, 20, 20, 20, 24)
Here's why this is happening.
1 + 3 = 4 → STAB → 6 → super effectiveness → 12
1 + 6 = 7 → STAB → 10 → super effectiveness → 20
For the first example, 1 is multipled by STAB and doubled by using a super effective move.
In the second example, 0.5 is lost from STAB, and the damage is doubled by using a super effective move.
Multi-Hit Moves
Multi-hit moves are peculiar. The calculations all work the same, so the damage will always be multiplied by five. Consider the fact that the consecutive round downs will slightly modify the damage before it is multiplied by five, and you understand why playing with "details" at the bottom of the calculation procedure can have huge consequences at the end. Multiplying your damage by four for a particular situation by simply adding one Attack point is really something.
The power of multi-hit moves is so low that a single hit won't happen more than six times. Because of this, the rolls will be 15 times the base damage minus 1. Let's look at the base damage minus 1. In our case, the formula becomes (BP / 12.5 * Atk / Def ) + 1 (rounded down).
Let's take three possibilities, with this value being 1, 2, or 3.
Application of STAB:
1 → 1 → 5
2 → 3 → 15
3 → 4 → 20
If the user uses a Life Orb:
1 → 1 → 1 → 5
2 → 3 → 4 → 20
3 → 4 → 5 → 25
For a practical application, let's revisit the Jolly Aipom example:
Fury Swipes is an 18 Base Power move, and Jolly Aipom has 16 Attack.
BP / 12.5 * Atk / Def + 1 = 18 / 12.5 * 16 / Def + 1 = 23.04 / Def + 1
If Def > 23.04, as in the first case, the damage will be 5.
If 23.04 > Def > 23.04/2 = 11.52, as in the second case, the damage will be 15 (20 with Life Orb).
If Def > 23.04/2 = 11.52, as in the third case, the damage will be at least 20 (25 with Life Orb).
In conclusion, Life Orb Jolly Aipom will do 5 damage to targets with at least 24 Defense, 20 to those with 12-23 Defense, and at least 25 to those with less than 11 Defense. This is why a single Attack or Defense point can completely modify the damage dealt. Life Orb Jolly Aipom does 5 damage to Spritzee with Fury Swipes and deals 12 with Return. Life Orb Adamant Aipom also does 12 damage to Spritzee with Return, but 20 with Fury Swipes. Return, however, has 12 more Base Power than Fury Swipes.
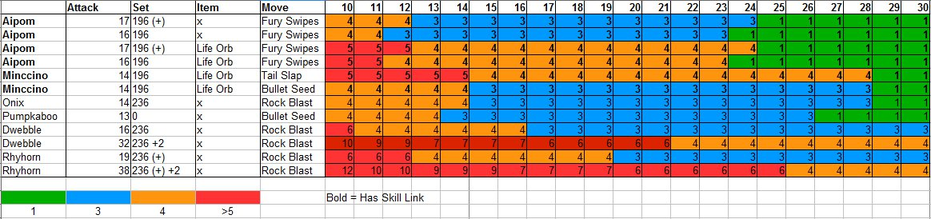
This applies to others as well; for example, with Onix, the base damage is 28, and so the same calculations can be made.
Here is a table that shows how much damage one hit will do depending on the target's Defense:
Life Orb versus Choice Items
Choice Band and Choice Specs directly affect the attack stats, while Life Orb affects the result of the damage calculations. In this way, they differ greatly. In a level 100 Pokémon battle, the difference barely matters; however, in LC, this +1 damage in the initial calculation will matter when using a Life Orb but not when using a Choice item. Because of this, even though Choice users still do more damage most of the time, there are some situations where Life Orb users will do more damage than Choice users.
236+ Atk Choice Band Mold Breaker Drilbur Earthquake vs. 0 HP / 196 Def Eviolite Mienfoo: 15-18 (71.4 - 85.7%) -- guaranteed 2HKO
(15, 15, 15, 15, 15, 15, 15, 16, 16, 16, 16, 16, 16, 16, 16, 18)
236+ Atk Life Orb Mold Breaker Drilbur Earthquake vs. 0 HP / 196 Def Eviolite Mienfoo: 13-17 (61.9 - 80.9%) -- guaranteed 2HKO
(13, 13, 13, 13, 16, 16, 16, 16, 16, 16, 16, 16, 17)
In red: Life Orb > Choice Band
In blue: Choice Band > Life Orb
Using a Choice item instead of a Life Orb rarely boosts damage output in LC. Considering the fact that a Choice item locks your Pokémon into one move and Life Orb makes your Pokémon lose only one HP if you have 19 HP, it's clear why Choice Band and Choice Specs should never be used in LC.
Conclusion
Building your own team is part of what makes Pokémon fun, and it's a lot like building your deck in a card game. Be it in Little Cup or other metagames, each team is unique because everyone thinks about the game differently; some people will want to use particular things or one specific Pokémon to handle one specific threat. Understanding damage can help with that, and that's the goal of this article; I hope it helped!
| « Previous Article | Home | Next Article » |