An Introduction to Spriting
| « Previous Article | Home | Next Article » |
Introduction
Unless you are new to online Pokémon, it is likely that you have heard of the term 'sprite' before, whether it be while you skim through Smeargle's Studio or in general conversation. Sprites are the media with which Game Freak, and countless other game designers and producers, portray their creations in a physical form – sprites are used for the Pokémon themselves in the games, but the backgrounds and characters are also sprites.
Over the years, spriting has almost become a culture across the Pokémon community, mainly due to the relatively quick and easy editing that can occasionally produce breathtaking results. To non-spriters, spriting can sometimes be seen as difficult, but with even with the slightest degree of knowledge spriting can become easy within minutes – you don't even have to be a talented artist to be able to sprite and, contrary to popular belief, no professional software is necessary. This article will present the basics of spriting and, hopefully, by the end you will have mastered recoloring in MS Paint – the foundations of all forms of spriting.
Recoloring forms the backbone of the spriting world, and is closely linked with more popular types of spriting, such as fusions, retypes, and sometimes even scratch spriting (these will be covered in a later issue). Recolors, while rarely done by themselves, are made to change the visual aesthetics of the sprite rather than the physical pose or concept. At one point the thought of how cool a Flareon would look with the color scheme of a Remoraid must have crossed your mind (if not, pretend that it has) and, to answer your wishes, this will be the first recolor that we will cover.
First, however, an explanation of the important tools in MS Paint is in order.
Tools of the Trade
- Free-Form Select
- While not used for recolors, the free-form select tool is the most used tool when it comes to fusions. Unlike the standard Select tool, this tool allows you to 'pick up' any part of the sprite, regardless of shape.
- Select
- This tool is generally not used, as the free-form select tool is favored in fusions. However, the Select tool has use in moving already cut parts or whole sprites very quickly, as you don't need to outline the whole sprite.
- Eraser
- The eraser tool is used to remove excess during a pixel-over, but also has a very handy trick when it comes to recoloring, which will be covered later in this article.
- Fill
- The fill tool is used by a good segment of spriters for recolors, but has generally been rendered obsolete by the eraser tool trick. The fill tool is, however, faster when correcting colors in a small area.
- Eyedropper/Pick Color
- The eyedropper is by far the most important tool in recoloring, allowing the selection of colors from one sprite to use in another.
- Pencil
- The pencil tool is normally 'outclassed' by the other tools when spriting, due to the fill tool more easily correcting colors and the eraser tool having a wider are to erase more pixels. The pencil is, however, occasionally used to eliminate maybe one or two pixels that the eraser tool – even on the smallest setting – is too large to reach.
The other tools in MS Paint have no relevance to spriting – do not be fooled into using the Paintbrush tool! Though the colors will be quickly changed, you will lose pixels in the process due to the fact that the outline of the paintbrush cursor cannot be seen – stick to the eraser and fill tools for recoloring. If you are still unsure of how each tool works, feel free to open a fresh file in Paint and have a scribble until you're confident.
How to Recolor
When you feel you have mastered the tools of spriting, the next step is transferring the sprites you want to use for your final product into Paint – this can be surprisingly difficult for the novice spriter, and it's important to develop good habits. There are many online sprite resources that can be quickly called upon to provide many different sprites. The best is probably PokémonElite2000 (PE2K), due to the wide variety of sprites available and simple layout. For our recolor we want to use the Flareon and Remoraid sprites, so click First Frame Front Sprites and then use Ctrl+F to find the desired link. The disadvantage of PE2K, however, is that it does not yet include HG/SS sprites. For these most recent sprites, go to GTS Plus, or search the Pokémon name in Bulbagarden Archives and click on the file which says 'currentsprite'. Now that we have located the sprites we want, right click and select 'Copy Image'. Then switch back to MS Paint, click the 'Select' tool, right-click and select 'Paste'. Your sprite should appear.
However! "What's with this weird black box?" I hear you ask. All sprites are saved in the Portable Network Graphics (.PNG) file format to retain their picture quality and avoid anti-aliasing (the computer adding shades of gray around the outline to smooth the lines). This makes the sprite appear with a black background. Do not fret, as there is an easy solution! If this is the sprite which you want to recolor, select the 'Fill' tool and a color which is not present in the sprite – this is most often MS Paint's vile green – and click on the background of the sprite.
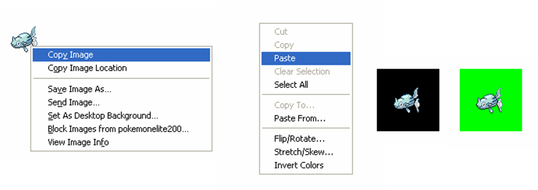
The 80x80 pixel box within which the sprite is held should now be green, with the desired sprite placed approximately in the center. It is not completely necessary to retain the 80x80 box, but adds a more realistic touch to the sprite, as all of Game Freak's Pokémon sprites are positioned in the same way. If the sprite is not the one which you are recoloring, you may simply repeat the process with the color white.
There are some cases when removing the black background that some of the Pokémon's outline also disappears, as with this Machamp, where the black pixels have been turned white by the 'Fill' tool.
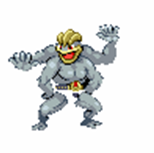
We are now faced with a dilemma – we either work with the half-outlined Machamp, which would result in a low-quality sprite, or we could attempt to fix the outline, but that would take far too long! Fortunately, there is a sneaky third option – Print Screen. Simply press the Print Screen button and paste the image into Paint in the same way that you would a normal sprite and your outline is completely retained. Unfortunately, the 80x80 box disappears when using this method, but a complete outline is much more important. You may then want to use the 'Select' tool to remove the actual sprite from the screenshot into your workspace.
It is also possible that you may encounter another problem when positioning your sprites – you attempt to move one sprite closer to the other, but it makes the latter disappear!
Luckily, this can be solved with the clicking of one button. When using the select tool you will see two odd combinations of shapes pop up at the side, below the main toolbar.

Simply select the bottom option as shown here, and all of the background color (covered later) - in this case, white - will be removed when using the 'Select' tool. This allows the sprites to be nice and close together, and thus easier to work with.
So you've got the two sprites you're going to use in the recolor in MS Paint and close together – what next? This is the best part – the actual recoloring! Within the spriting community, there are generally two ways of spriting: using the 'Fill' tool, and using the 'eraser trick'.
Fill Tool
Quite a few spriters work this way – using the eyedropper tool to select, for example, the lightest shade of the sprite providing the colors [Remoraid], and then using the fill tool to change the color of the lightest shade on the sprite that is being recolored (Flareon). This is then repeated with all of the other shades. Using the fill tool is definitely the simplest way to recolor, but takes much longer than the eraser trick and has more scope for human error.
Eraser Trick
If you like getting things done fast, then the eraser trick is for you. Though it is more complicated for novice spriters to get the hang of, the recoloring is finished significantly faster. First, select the eyedropper tool and sample the color that you want to remove with the left mouse button. Then take the eyedropper tool again and select the color you want to add in its place with the right mouse button – this sets the colors as the foreground and background colors respectively. Then whip out the eraser tool, and hold down the right click button as you skim over the sprite – only one shade should be replaced with the color you right clicked on a few seconds ago. Repeat this for the other shades.
Repeat these steps with a secondary color (in this case, the teal-white of Remoraid's fins on the bushy mane and tail of Flareon). After following these steps, you should end up with something like this:

If not, don't fret! Check back through the steps and the Top Tips below and, if something is still wrong, many people are willing to help in the Spriting thread in Smeargle's Studio!
Top Tips
- Remember to do the outlines! Though it may not seem to make a huge difference, the execution of the outline is the factor that differentiates between a good and a bad spriter.
- Do not begin with difficult sprites such as legendary Pokémon. We all know just how badass a Remoraid-colored Palkia would look, but the sprites of legendary Pokémon are much larger and more complicated than a humble Delibird. This size and detail means more shades, which allows for more error.
- Sometimes the color scheme which you are applying to a Pokémon such as Palkia may not cover all of the shades, or have enough secondary colors. In these cases it is often best to simply use a different color scheme or in some special circumstances merge the top two and/or bottom two shades to reduce the amount of shades. Never create your own color schemes, even when scratching.
- Never use the sample colors of MS Paint! I know how attractive that bright pink looks, but please refrain from using these colors in sprites – they are easily recognizable as the sample colors and generally do not fit in.
- Don't be shy about using Ctrl+Z! The Ctrl+Z shortcut, more commonly known as 'Undo', is essential when spriting – you don't want to keep importing sprites when you accidentally bleed over the outline! There's a saying in the spriting community: "You can tell a good spriter by the speed with which he/she presses Ctrl+Z". Or at least there is now!
- Always follow the shading! There's nothing worse than someone who completely ignores the shading – it makes for a terrible sprite by default.
- Zoom in! Pixels are tiny, and for the sake of your health it is recommended that you go to View > Zoom > Large size to preserve your eyesight.
Getting Your Masterful Creation Online
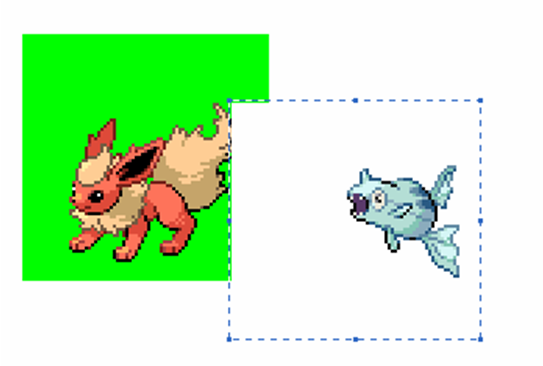
Yes it's all well and good making a fantastic Remoraid-colored Flareon in MS Paint but no-one will be able to bask in its beauty if you just leave it there – you need some way to show it to the World Wide Web! Be warned – this is where the majority of amateur spriters go wrong. Using the Select tool in MS Paint, make a nice box around the 80x80 box within which your sprite is, hopefully, placed – take note that the select tool include pixels behind the dotted line, so your selection should look not dissimilar to this:

This is the point at which some spriters go wrong – right click on your new box and select 'Copy'. Do not select 'Copy to'! You will save your sprite, but it will be saved as a .JPG file and the colors will be distorted almost beyond recognition. After you have copied the box, select 'Image', 'Attributes' and change the canvas size to 80x80 pixels. Start a fresh file and then, using the select tool once again, paste our sprite onto the canvas. Then you may go to 'File' > 'Save as', making sure to change the file format to .PNG! Do not take the shortcut of 'File' > 'Save as' in Paint without changing the size of the canvas. – while it saves as a .BMP file, this is not catastrophic. However, this saves the whole canvas – all 1000x1000 pixels, of which your 80x80 sprite is a tiny part.
Now that you have saved your sprite, you can focus on getting it onto the Internet – or can you? There was a reason for the instruction of making the box a color which is not present in the sprite – transparency. There are, like saving the file, many ways of adding transparency, but the easiest way without using specialist software is through the use of the site 'Iaza'. Follow the instructions and your sprite should have a transparent background in no time (transparency is in the far right column).
There are many - you've heard this one before. The next step is uploading your sprite so that it can grace Smeargle's Studio on Smogon. There are many image hosting sites such as ImageShack, Tinypic and Photobucket, and you can even upload a small amount of sprites through your own user profile.
Conclusion
As has been stated many times, recolors are the foundation of many forms of spriting, and the knowledge on how to import, export, and change the sprites through the tools of MS Paint will be of great value to you. Next issue we will be looking at Disguises – a form of spriting that is closely linked to, but not quite the same as, recolors.
Until then, good luck and happy spriting!
| « Previous Article | Home | Next Article » |