The Run
I haven’t kept minitious records of each round, just the teams I used. I will briefly go through them.
Rounds 1-2-3: no records. Rounds 1 and 2 can basically be auto-piloted, since the AI is random, Round 3 is more fun, preparing you for the real deal. It’s important to swap after each battle in rounds 1 and 2, so you will get at least one elevation for the upcoming rounds.
Round 4: Ludicolo2 etc.
My elevation was Ludicolo2, which can overpower most mons with its 15IVs and great coverage. Didn’t remember the rest of the team, probably they didn’t have to do too much.
Round 5: Tauros2, Hypno2--> Alakazam2, Milotic2 - 35 wins, 21 swaps.
One absolute elite mon with Tauros2 (great ability, powerful, set-up and healing), whose fighting weakness is covered by Hypno2 (whose ghost weakness in turn is covered by Tauros). Milotic2 is not defensive but is modest with 255 SpATK EVs (and 15IVs), which makes it hit hard with Surf and Ice Beam. Changed Hypno2 for Alakazam2 to hit fighting types back harder and not be reliant on Hypnosis accuracy.
round 6: Milotic4, Electabuzz3, Victreebel3 42 wins, 22 swaps.
Yes, I used Victreebel. And Electabuzz. On one team. And it beat Noland Gold! How on earth, you might think. Of course, the IVs (31 on Milotic, 21 on Electa and Vic) help a lot. But mostly it’s because Milotic4 is so strong: with DEF&Sp.DEF investmest, Recover AND Leftovers it’s almost unkillable. It still has a modest nature with ASLO Sp.ATK investment, so it still hits pretty hard. All that was needed was good support to cover weaknesses and things it couldn’t kill. Victreebel could effortlessly switch into Thunderbolts and Grass moves and either kill with dual coverage or double to Electabuzz (or paralyze with Stun Spore if nothing works). Electabuzz in itself has pretty good utility with a strong and fast STAB Thunderbolt, and coverage with Ice and Fire Punch. This let it deal with the water mons Milotic couldn’t kill and Cross Chop in the last slot would help against Blissey3 and Snorlax3 (even though those last two can perfectly well be handled by Milotic4).
I don’t remember the Gold battle very well, but I remember Milotic dropped at some point, so I was left with Vic and Electabuzz only. A funny moment occurred when Vic had to use Ingrain against the 2nd mon, but then I wanted to switch on the 3rd mon, but of course I couldn’t. Luckily Electabuzz was able to win.
round 7: Ursaring4, Arcanine4, Shuckle4 49 wins, 23 swaps
This was a really fun team to play with. The damage outputs of Ursaring’s STAB DE of its 200 ATK stat and Arcanine’s STAB Overheat are just insane. Both mons have also plenty of other coverage. And if something dangerous turned up, Arcanine could lower it’s attack with Intimidate and there was always Shuckle in the back who can 1v1 most mons (note that also in these match-ups the difference between 3 and 31IV helps a lot) or at least stall them out, if they would be toxic immune.
round 8: Metagross4, Regice1, Ludicolo2 --> Latias1 56 wins, 25 swaps
Metagross4 and Regice1 in the 31IV draft is amazing. Together they provide great coverage and Regice even heals. However, fire attacks are a shared weakness which cannot be underestimated with a lot of STAB Overheats and Fire Blasts around. That’s why Ludicolo2 could make a return from round 3 to simply Surf these mons away. But then, when Latias1 turns up, why not just take it? It has better stats even at 3IVs and a fire resistance.
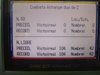
round 9: Hariyama4, Feraligatr2--> Dusclops2, Marowak2--> Regice4 63 wins, 28 swaps
This was rather a problematic draft. Marowak2 isn’t great here because it generally doesn’t get the chance to use SD and sweep, because it’s slow – also Icy Wind doesn’t do much (still it can one-shot a lot with EQ). Therefore it was clear that Hariyama4 had to be the pivotal mon and boy did it deliver. Cross Chop is risky, but it didn’t have to rely on that alone: with a 189 ATK stat even Fake Out does significant damage to a lot of mons. Therefore it can Fake Out, kill, switch out, switch in later, Fake Out again and perhaps hit another time. I chose Feraligatr2 probably as best among the worst – it has coverage and a Torrent Surf still hits quite hard, I guess.
Luckily I could quickly switch Feraligatr for Dusclops2, also one of the best mons in the Factory to have as a switch-in. Its moves don’t depend on stats and even with 3IV it’s bulk and typing is great. With Protect, Confuse Ray, Double Team, Leftovers AND the Pressure ability it’s an ultimate staller. Toxic is just bonus, but a great bonus.
Later I came across Regice4, who ALSO has Double Team and Leftovers. It’s not Sp.ATK invested, so it should rather kill with Hail than with Ice Beam. It’s a super slow team (both considering speed stats and tactics), but still fun to play, each time figuring out whether Dusclops or Regice would be the mon to use and how to keep both healthy for the next mon.
One battle in particular, I think it was round 6, was interesting – this trainer had no type preference. If I remember correctly, the first mon was Water/Ice, probably Lapras or Dewgong, which beat Hariyama (probably with an OHKO) – I managed to revenge it with Dusclops, but then Tentacruel showed up. Since there had now been two Water mons out while having no type preference, this meant that the last mon HAD TO BE either Poison or Ice. Quite tricky, since my only moves to kill were Toxic on Dusclops and Hail on Regice! Therefore, I had to keep BOTH alive. It was quite a challenge, but I managed to do it with some manoevering. When this succeeds, seeing that the last mon is indeed poison or ice (tbh I don’t remember which it was anymore – vaguely I thought that Walrein played a role, but it would have forced preference for water type) is very satisfying
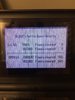
round 10: Latios1, Regirock1, Registeel1 70 wins, 29 swaps.
Nothing much to say, 31IV Latios1 is already a gift from heaven and Regirock1 and Registeel1 are great switch-ins. Regirock even provides extra utility with Explosion and Registeel1 is humbly one of the most reliable mons in the Factory: if it gets two or three turns to set up, it will set up all the way and Metal Claws do hurt at +6.
round 11: Starmie6, Entei3--> Machamp2, Swampert4 77 wins, 29 swaps.
Don’t remember much from this round, but I can imagine that Starmie6 just will not die with Recover and Leftovers. It will precook its opponents with Twave and Confuse Ray, after which Entei3 (later Machamp2, which also has healing) and Swampert4 can clean up. Example of using your strongest mon to repeatly support sweepers.
round 12: Granbull4, Gengar7, Swampert3 84 wins, 32 swaps.
Three excellent sweepers: Granbull4 gets extra punch from CB and has extra utility with Intimidate – Gengar 7 doesn’t need any extra punch whatsoever with its 200 Sp.ATK stat and has great extra utility with Dbond, being virtually always able to beat at least 2 mons. Swampert is just Swampert.
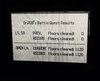
round 13: Raikou3--> Medicham2, Snorlax4, Kingdra4 91 wins, 34 swaps.
Not a great team at first glance. Raikou3 has a hard-hitting Tblot, Twave and some extra utility with Roar. Snorlax4 has good match-ups vs special attackers, but Kingdra4 is the star of the team: it has great defensive qualities and healing, which gives it time to set up DDs. Its only weakness (dragon) is nicely covered by shooting Ice Beams to OHKO most Dragon Claw users. I don’t remember at which point Medicham2 came in, perhaps to adjust for a trainer a preference for Ground types. It’s plan is simple: Endure, Salac and STAB Reversal.
round 14: Entei2, Meganium2, Lapras7 98 wins, 35 swaps
Classic Fire-Grass-Water/Ice synergy to cover each others weaknesses. As mentioned above, Meganium2 can often solo its way through enemies with Leech Seed and set-up. Entei2 can support this with Reflect. Lapras7 is a bit of an oddball with it’s OHKO-only moveset, but is very hard to kill with its defensive investment and free Rest.
I wrote down that I was in danger vs a team of Gyarados1, Latios23 and Salamence8. These mons have to be treated most carefully because of their many dangerous sets. Probably I switch to Meganium turn 1 and then Gyarados could Twave and started setting up DDs – I vaguely remember to survive only because it stopped attacking at some point. Probably it was also the only battle in which Lapras really had to do work. Interestingly enough, I didn’t take any of these mons, because it wouldn’t support the team strategy centering Meganium.
round 15: Tauros2, Starmie4, Moltres2--> Regirock2--> Typhlosion4 105 wins 38 swaps
Tauros2 and Starmie4 are simple enough to understand (Starmie’s Psychic covers Tauros’s weakness), Moltres2 is a bit more remarkable. It has some utility as a Pressure staller with DT and Protect, but lacks defensive investment and healing. At the same time its STAB Overheat from its 177 Sp.ATK stat just hits hard. I don’t recall why exactly I made the swaps – perhaps based on type preference of the next trainer. Regirock2 has utility with Explosion and Typhlosion4 has a huge Overheat in a pinch.
round 16: Slaking3, Slowking2, Sceptile3--> Gengar8 112 wins, 40 swaps.
CB Slaking3 can KO a lot on turn one and usually come back in later to do the same. Slowking2 supports it by crippling its opponet with Yawn or Twave and at the same time can hit hard with STAB Surf and Psychic. Sceptile3 is a bit odd, but helps against opponents raining Tbolts all over. Gengar8 is great even with 3IVs, still hitting hard and being fast with Dbonds – also, it has great type synergy with Slaking.
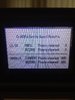
round 17: Machamp7, Aggron1-->Regice4, Meganium3-->Gyarados3-->Umbreon4 119 wins, swaps
I recall this being a really problematic draft. I figured that Machamp7 was my ace, and had to build my team around it – that’s where the odd choice of Aggron1 come from, a mon that doesn’t have many qualities in isolation. Here, it performs the role of switching into psychic and flying moves Machamp would have trouble setting up against. Meganium3 as a physical attacker is also quite strange, but apparently the best available. In such a case you have to be a bit lucky in the first battles and slowly try to improve your team with swaps.
Here, all swaps support Machamp: Regice4 is great at stalling special attackers, Gyarados3 softens physical attackers with Intimidate and with Umbreon4 suddenly my team had become quite OP: triple DT, double leftovers, good type synergy. The satisfaction is great when you stall out the opposing mon, fully set-up 6dt’s and a sub with Machamp and start unleashing STAB Focus Punches from its 200 ATK stat!
round 18: Espeon4, Snorlax6, Meta2 126 wins, 45 swaps.
After a problematic round 17, it was nice to take a bit of a breather in this round. Espeon4 ranks among the strongest, easiest to use mons in the Factory: its STAB Psychic from its 200Sp.ATK stat kills a lot – if it doesn’t, it will after a CM. Anything Espeon cannot handle, Snorlax6 or Metagross2 can probably deal with. Note that Metagross is good here as a normal resist, to deal with STAB DE’s.
round 19: Metagross6, Crobat2, Flygon3 133 wins, 46 swaps.
I think Crobat is really cool and I like to use a staller because of their reliability, but Crobat2’s bulk isn’t as great as other stallers. However, it’s speed partly makes up for that. Luckily, it worked well enough since it was flanked by two great mons. Together Metagross6 and Flygon3 have great coverage together (this Meta lacks EQ). With Metagross as a starter on threatening EQ’s you can switch to Crobat, while in case of fire moves you switch to Flygon.
Once I got in danger vs Salamence5, Fearow1 and Gyarados3. Salamence beat Metagross, but was revenged (probably by Flygon). Fearow damaged my team some more and then came Gyarados. It’s always hard to play around the four possible sets since it doesn’t have to many specific style moves. I remember that I confused it, but never hit itself 3 or 4 times in a row. I came close to defeat, but was able to just outdamage it.
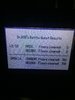
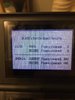
round 20: Armaldo4, Electrode4, Snorlax3 --> Flygon4 139 wins, 1 loss 48 swaps.
There we are, the round which turned out to be the last one. The draft wasn’t easy with 4 electric mons (no Raikou or Zapdos). Luckily there was Armaldo4, about which I used to be skeptical since it’s so slow. But then again, it’s hit-taking abililty (it’s a joy to do calcs with Battle Armor, since for once you don’t have to worry about crits!) and raw power is great. Then Electrode4 is actually also a great mon. It may only be able to take one hit, but in return it can Tbolt twice to try to KO and then explode for a second KO. Snorlax3 was more of a sponge than anything else – Mega Kick is just bad and it has no healing. Drawback of this team is that it necessitates two mons alive for the endgame – only then Armaldo can use DE and Electrode can explode without drawbacks.
The first battle was quite problematic – even though ‘impossible to predict’ is usually good news (it’s often Alakazam3, or much better Clefable1). First mon was Flygon, who dealt some damage after being OHKO’ed by DE. The second mon was Scizor4, which pretty much walled Armaldo (who was locked into DE, to make things worse). It also was able to boost, so it was a very scary situation. In the end I had to sacrifice Electrode (pray that Explosion would bypass Brightpowder) and then Clefable1 came out. Usually a laughable mon, but Snorlax could only hit it with Mega Kick (if it would hit after some dt’s…). Armaldo was low on health but luckily still alive and I could survive.
I was glad to get rid of Snorlax for Flygon, which proved to be Flygon4. I had a few bad match-ups (like a Claydol lead) but actually made it to battle 7 quite swiftly. Perhaps a bit too swiftly, as I let my guard down…
Against the last trainer, you should always be a bit more on your toes, since they have 6IV pokes. The assistant gave no type or style preference. I’ll go through the battle in detail.
Trainer sent out Weezing!
Go! Armaldo!
Quite a bad match-up, Weezing has good defense and Armaldo has no super-effective move, nor have my other mons – Flygon cannot really hurt it. No style preference excludes Weezing2. I’m slower and list the move that will come:
Weezing1@BP will probably Will-O-Wisp and otherwise Shadow Ball or Smokescreen.
Weezing3@FB will either Flamethrower/Tbolt or (unlikely) Explode
Weezing4@FB will either Shadow Ball or (unlikely) Explode
I consider my options: 1. click DE; 2. click Rock Slide; 3. switch to Electrode. Electrode 2HKO’s with Tbolt, but S-ball and Sludge Bomb do 93.3-110% damage – I don’t want to risk Electrode so early, since this limits my options vs mon2 and mon3. Staying in is also risky, because wisp might cripple my Armaldo for the rest of the battle. Since Electrode holds Lum, it would very much welcome the wisp and basically have a free switch-in. I decide to click Rock Slide.
Foe Weezing used Will-O-Wisp!
It’s Weezing1…
Armaldo was burned!
Armaldo used Rock Slide!
Armaldo’s attack missed!
Armaldo is hurt by burn!
A horror scenario – Armaldo crippled on turn 1 without having done any damage myself.
Foe Weezing used Shadow Ball! (hits, 19.7-23.6%)
Armaldo used Rock Slide! (hits, 30.6-36.4%)
Armaldo is hurt by burn!
One more hit and at least Electrode will be able to revenge with a single Tbolt.
Foe Weezing used Shadow Ball! (hits, 19.7-23.6%)
Armaldo used Rock Slide!
Armaldo’s attack missed!
Armaldo is hurt by burn!
Very bad, two misses with Rock Slide, but actually not inconceivable – brightpowder drops its accuracy to only 81%. I curse myself for not switching to Electrode on turn 1 and start a long thinking process to maximise my chances. Armaldo is now in range of S-ball, so this move is guaranteed. I can either sack Armaldo to maximise my chances to revenge with Electrode, or switch immediately to Electrode in order to hopefully survive a S-ball+Sludge Bomb with Electrode – with Armaldo alive Electrode could still explode on the last mon, if Flygon also perishes. Lastly, Flygon would 2HKO with D-Claw at this point, but would be severly hurt by two S-balls – and I don’t want to risk having a second mon burned… I think I make the optimal play.
Foe Weezing uses Shadow Ball! (hits)
Armaldo fainted!
Do it! Electrode!
Electrode used Thunderbolt! (hits, 57.2-67.9%)
Foe Weezing used Will-O-Wisp!
Weezing’s attack missed!
Electrode used Thunderbolt! (hits)
Foe Weezing fainted!
Uff, that part went well, now it’s 2v2 – I’m lost my strongest mon, but the battle is still open.
Trainer sent out Victreebel!
Interesting. Actually, I can figure out which Victreebel it is, since 3 and 4 hold BP and 1 has a style ‘5’ move, leaving only Victreebel2@lefties. Electrode and Flygon are both faster, so I have some control over the next moves. However, Sleep Powder is very scary. Victreebel can do big damage with Sludge Bomb or use Sleep Powder.
One option is to just explode and hope Flygon can 1v1 the last mon – perhaps I would’ve if my Flygon had 31 IVs. But Flygon can do huge damage to Victreebel with EQ (and maybe Scope Lens will do work for once?
I can also use Tbolt to soak up a Sleep Powder with Lum and then switch and use EQ – however, that will not kill after two leftovers recoveries. Twave seems too risky, Victreebel can do too much damage with its attacks or still use Sleep Powder.
I decide to switch to Flygon – it can tank Sludge Bomb really well and Sleep Powder – it can miss.
Come back, Electrode!
Go, Flygon!
Victreebel used Sleep Powder!
Victreebel’s attack missed!
Perfect! Maybe now it will use Giga Drain, or even Attract (I’m opposite gender)?
Flygon uses Earthquake! (hit, 69.2-81.8%)
Victreebel used Sleep Power!
Flygon fell asleep!
Victreebel’s leftovers restored its HP a little.
Oh no. Now it will use Giga Drain for sure. It’s too late for switching to Electrode, because Giga Drain+Sludge Bomb kills and then I only have sleeping Flygon left. I have to burn sleep turns and hope it goes for Attract. If I wake up after 2 turns, I will still kill with EQ, after 3 turns it will have healed to much to kill with EQ, but then at least Electrode will return. If I wake up after 4 or 5 turns, it’s probably over…
Flygon is fast asleep.
Foe Victreebel used Giga Drain! (hit, 39.7-46.8%, 19.8-23.4% heal)
Victreebel’s leftovers restored its HP a little.
Flygon is fast asleep.
Foe Victreebel used Giga Drain! (hit, 39.7-46.8%, 19.8-23.4% heal)
Victreebel’s leftovers restored its HP a little.
Bugger. Now I have to pray. After all that healing Victreebel is out of EQ range.
Flygon woke up!
Flygon used Earthquake! (hit, 69.2-81.8%)
Foe Victreebel used Giga Drain! (hit, 20hp damage, 10 hp heal)
Flygon fainted!
Victreebel’s leftovers restored its HP a little.
Go for it! Electrode!
Electrode used Thunderbolt! (hit, 36.3-43.3%)
Foe Victreebel fainted!
At least that worked out. 3v3 turned into 2v2 into 1v1. Now let’s pray there won’t be a ground type last.
Trainer sent out Dusclops!
Dusclops? Could be worse! Actually, there is only one without Leftovers, Dusclops4: Double-Edge, Shadow Ball, Curse, Rest. Not too scary! Checking the calcs: Tbolt will 3HKO, but S-ball has a 32.8% chance to 2HKO – still in my favor. Plus, it
may use Curse, then I’ll win for sure!
Electrode used Thunderbolt! (hit, 38-45.5%)
Foe Dusclops used Shadow Ball! (hit, 100%)
A critical hit!
Electrode fainted!
AAAAAAH! Killed by a crit in the end (which also just killed 43.8% of the time)… But okay, that’s how I expected the run to end anyway – there have been situations before when I would lose to a crit, hax or a miss.
Analysis
But what bugs me a bit are my decisions in this last battle. Thinking back, on turn 1 I probably should’ve switched to Electrode – I didn’t do that, because if Weezing would use Shadow Ball, I wouldn’t know if it was Weezing1 or Weezing4. Then I would be in a rough spot, because I’d be in Sludge Bomb kill range of Weezing1 and Weezing4. I could proceed to Flygon turn 2, tank the Sludge Bomb and D-claw in return turn 3. Then Weezing1 would use wisp/S-ball/smokescreen and Weezing4 would use Frustration (or maybe Explosion). Again D-claw turn 4 –
- vs Weezing1 Flygon would live and kill the next turn (I would have Electrode with S-ball damage and Flygon with at least Sludge Bomb damage and possibly a burn).
- vs Weezing4 Flygon would be killed by Frustration, but then Electrode would revenge kill, leaving me Electrode (with S-ball damage) and a healthy Armaldo. Then, blowing up vs Victreebel would make sense, because it would leave a 1v1 with Armaldo – indeed Armaldo beats Dusclops (and will not get crit!).
And if after the switch to Electrode turn one Weezing3 would use Flamethrower or Thunderbolt? I would always live a following Sludge Bomb (barring crits) and 2HKO with Tbolt, leaving me a 3v2, soon to be a 2v1.
Given the two Rock Slide misses, also turn 1 Double-Edge may have been a better option – but I didn’t want to lose HP for nothing.
As for the 2v2 situation, maybe I should have used Tbolt with Electrode (99.5% 3HKO) – on a Sleep Powder, Lum would activate and then only a consecutive Sleep Powder hit would prevent me from killing. Next I would switch to Flygon, taking a Sludge Bomb and revenge with EQ, leaving me a ~67% Flygon and a sleeping Electrode. If Victreebel would use Sludge Bomb turn 1, it would guaranteed see the kill next, providing a ‘safe’ switch-in (not risking Sleep Powder) for Flygon, which would ensure a free EQ. But as we saw in the battle, that doesn’t guarantee anything – I got to the same game state with a healthy Electrode instead. Under the assumption that the opponent would hit its moves, it’s not better than in the real battle, but if the opponent were to miss (as happened in the battle) it increases my chances.

 197.9 KB Views: 39